How do you Integrate SharePoint Planner into your SharePoint Online site?
Microsoft SharePoint Planner is a planning application available on the Microsoft Office 365 platform. Planner enables users and teams to create plans, assemble and assign tasks, share files, communicate and collaborate with other users, and receive progress updates via various means on the Office 365 platform.
On your Planner board, you can sort your tasks into columns (or buckets). Buckets can indicate stages of development, days of the week, sprints, and more. You can move tasks around your board by simply dragging and dropping them, so if you complete a task or just want to prioritize and shuffle things around, you can do that easily. Planner boards are helpful for communication, too, since they indicate where you and the rest of your team are with respect to completing tasks. Additionally, if you are looking for analytics, you can switch to charts view to display your team’s progress.
Microsoft has brought in tremendous capabilities recently to integrate SharePoint Planner into SharePoint team sites directly as a Plan and as a web part.
Let us understand step by step process of how we can integrate planners in team sites.
How to Create a Plan in SharePoint
1. From the SharePoint team site home page, click New > Plan.
2. Enter a name for the plan and click Create.
The two screenshots below show how to create a Plan through SharePoint:
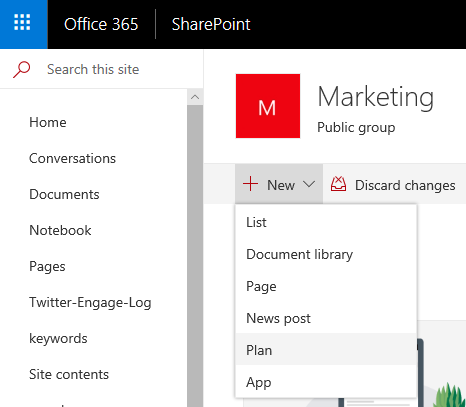
The new plan will automatically be created and accessible through the Office 365 Planner app. The plan will automatically grant people permission who are members of the SharePoint site, including guest users.
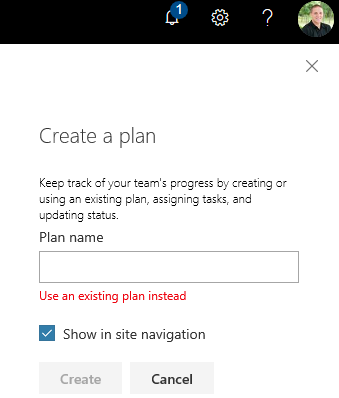
Office 365 will keep the Planner permission in sync with your SharePoint site members. Adding new members to a SharePoint site will automatically give the person access to the plan.
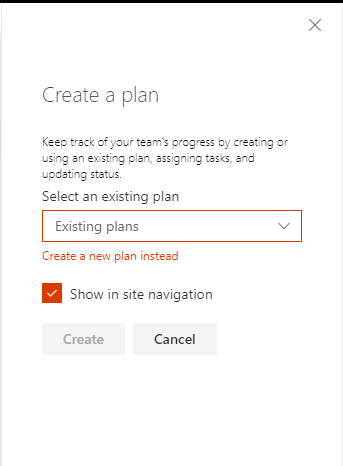
If you choose to use an existing Plan, you will be asked to select an existing Plan linked to the underlying Office 365 Group.
Bear in mind that this new Planner integration is not available in Communication Sites. However, Planner web-part can be used on Communication sites.
How Do You Add SharePoint Planner Web-part in SharePoint Pages?
1. Go to the page where you want to add the Planner web part.
2. If you’re not in edit mode already, click Edit at the top right of the page.
3. Hover your mouse above or below an existing web part or under the title region, click , and then select the Planner web part.
4. If you want to create a new plan, enter a new plan name under Plan, and then click Create.
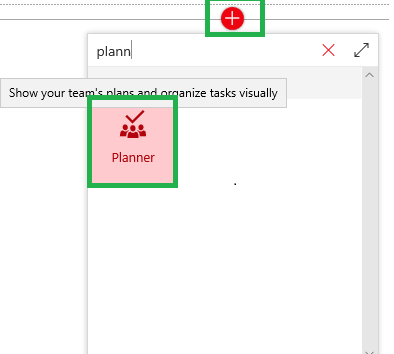
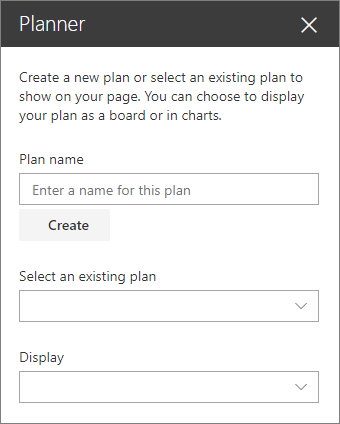
5. If you want to show an existing plan, select the plan you want to use in the box under Select an existing plan.
6. Under Display, select whether to show your plan in Boards or track your progress visually in Charts.
Planner Chart Display
SharePoint web parts help you quickly glean and access relevant information, from internal news to shared documents. The new Planner web part adds to this experience, allowing you to add plan information directly on pages and news posts. Depending on what task information you think is most relevant to your team, you can choose between the Planner Board or Charts view to appear on your homepage.

Conclusion
Microsoft has really come up with this beautiful functionality of the new Planner App which provides an easy way to create new plans linked to an existing modern SPO site or simply uses an existing one. The App provides a full-page experience where users can work with a Planner Plan without having to leave the modern SPO site and browse the Planner location in an Office 365 tenant.
Enjoy setting this up within minutes with the steps explained above! Still, if you face any difficulties with setting up the SharePoint planner in your environment, we are just a few clicks away. Contact us here or reach out to us at [email protected] and our team of SharePoint Consultants will be right there to help you out.


